 Cross-university platform portal
Show a desktop notification when the AI TA finishes replying
Notify me when classmates post messages in the forum
Play an alert sound whenever there is a new notification
From scratch, complete Course creation and setup in six steps
Download PDF version Methodology document Feature tutorial videosUedu is a university ed-tech platform centred on generative artificial intelligence, integrating teaching, learning and research to build an AI teaching assistant system for university classrooms.
Platform core features include:
Platform website: https://uedu.tw
If your university is a partner institution, you can use a dedicated subdomain (for example, ncu.uedu.tw, ntu.uedu.tw, nthu.uedu.tw, nycu.uedu.tw, nptu.uedu.tw), and all functions are exactly the same.
This guide is designed for instructors using Uedu for the first time, taking you from zero to completing course creation and basic setup. The document uses the following callout boxes:
The green frame provides a quick operational tip and practical advice.
The yellow box indicates notes to help you avoid common mistakes.
The red box contains important safety information; please follow it carefully.
Here are the six key steps for new teachers to get started:
| Step | Task | Description | Section |
|---|---|---|---|
| 1 | Sign up and log in | Create an account with Google, Apple ID or email | Chapter 2 |
| 2 | Claim or create a Course | Retrieve your course instructor permissions | Chapter 3 |
| 3 | Set up the AI teaching assistant | Customised AI teaching style and behaviour | Chapter 4 |
| 4 | Set course privacy | Manage course codes and enrolment methods | Chapter 5 |
| 5 | Invite students to join | Share code or link with students | Chapter 6 |
| 6 | Enable two-step verification | Mandatory requirement for instructor account security | Chapter 11 |
Please follow the steps below to create your Uedu account:
ncu.uedu.tw/signin)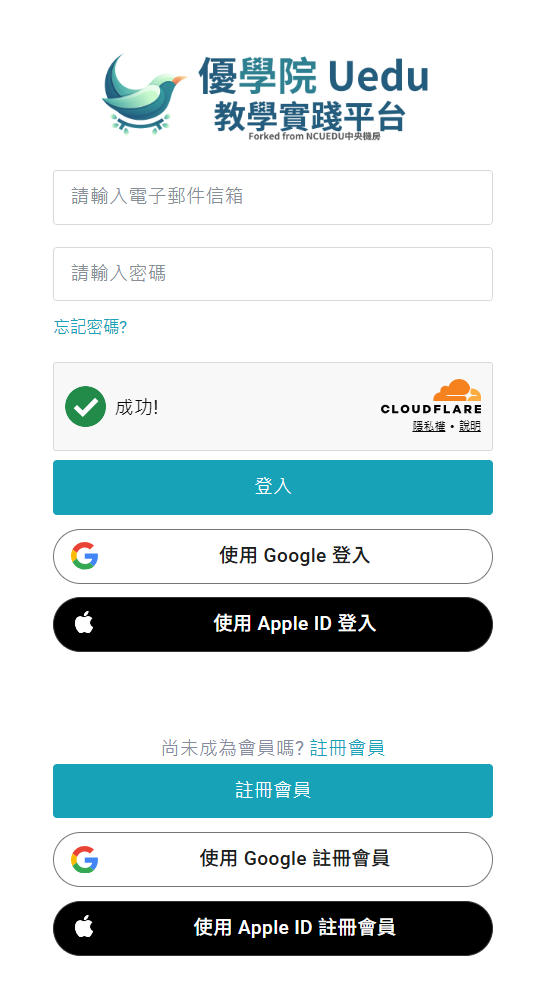
We recommend using your school's .edu.tw email address to register. You will need to verify your Instructor identity when claiming a Course later, and using a school email can simplify the process.
Some partner universities have dedicated subdomains; the page will display that university's logo and colour scheme:
| University | URL |
|---|---|
| National Central University | ncu.uedu.tw |
| National Taiwan University | ntu.uedu.tw |
| National Yang Ming Chiao Tung University | nycu.uedu.tw |
| National Tsing Hua University | nthu.uedu.tw |
| National Taiwan Normal University | ntnu.uedu.tw |
| National Pingtung University | nptu.uedu.tw |
The functions of all subdomains are exactly the same as the main domain; the only difference is the page appearance.
Uedu provides two ways for Instructors to obtain management permissions for a Course:
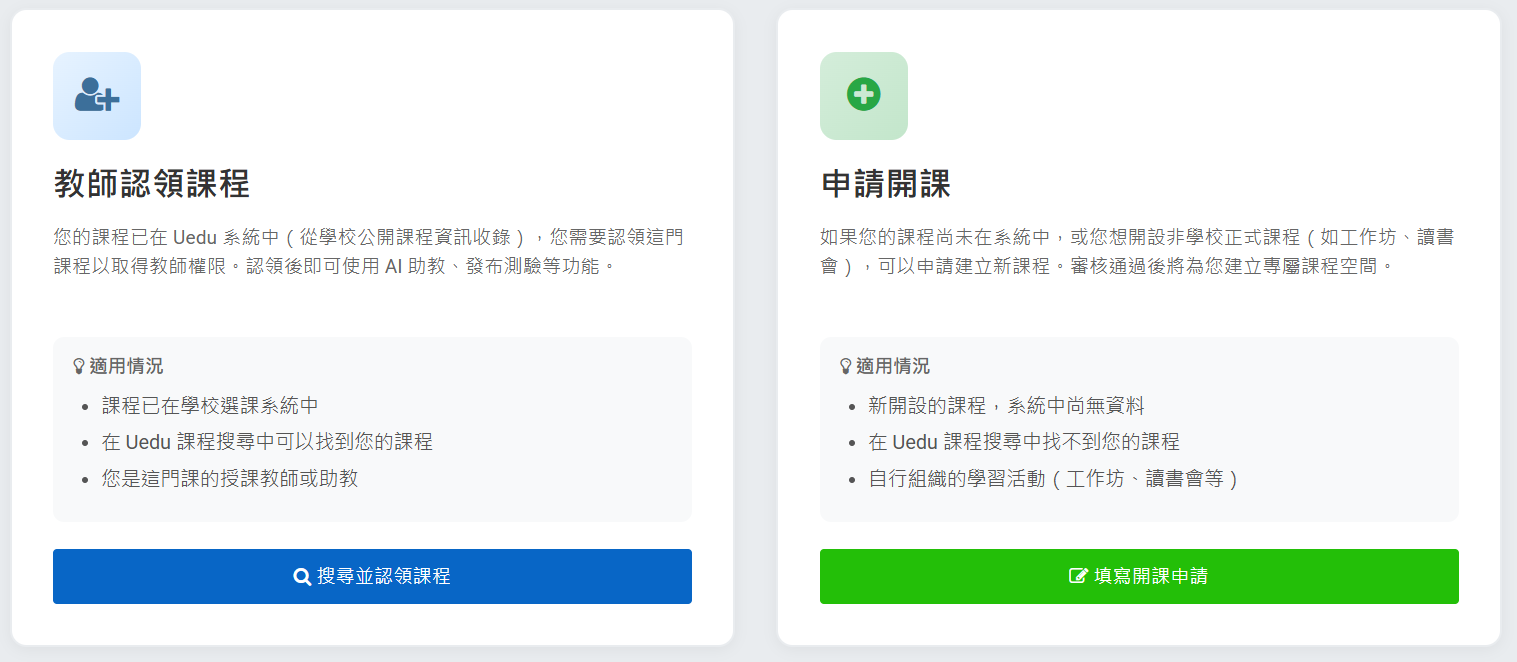
If your university is a Uedu partner institution, course data has usually already been imported by the institution. We recommend trying 'Claim Course' first.
The process for claiming a Course requires three steps: search for the Course, verify instructor identity, and wait for review.
114-2)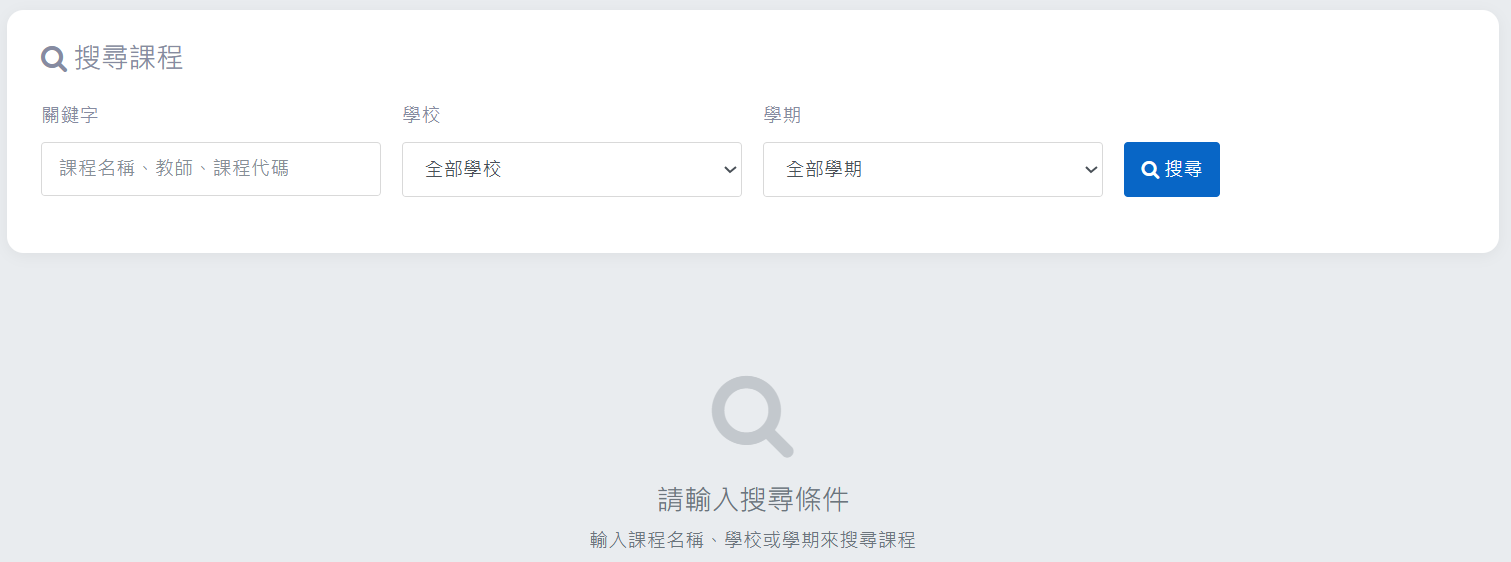
.edu.tw)The verification code is valid for 15 minutes. If it expires, you must send it again; there is a 5-minute cooldown between sends. The system only accepts institutional email addresses (e.g. .edu.tw, .edu, .ac.jp) and does not accept personal email addresses (e.g. Gmail, Yahoo).
Once the claim is approved, the system will automatically set the Course to private and generate a 6-digit Course code. You can get the student join link from the approval notification email.
If your Course cannot be found in the system, you can create it yourself:
If you provided a syllabus or course description when creating the Course, the system will automatically use AI to generate an initial AI TA System Prompt for you, saving time on later configuration.
You can check the application progress at any time:
Application status notes:
| Status | Description |
|---|---|
| Pending review | Submitted, awaiting admin review |
| Passed (Approved) | Approved; you may start using it |
| Rejected (Rejected) | Review failed; you can view the reason and apply again |
UeduGPTs is a core feature of Uedu, providing a dedicated AI teaching assistant for each Course. Students can interact with the AI teaching assistant at any time and receive guidance and support related to the Course.
After your course claim or creation has been approved, please follow the steps below to enter Course Setup:
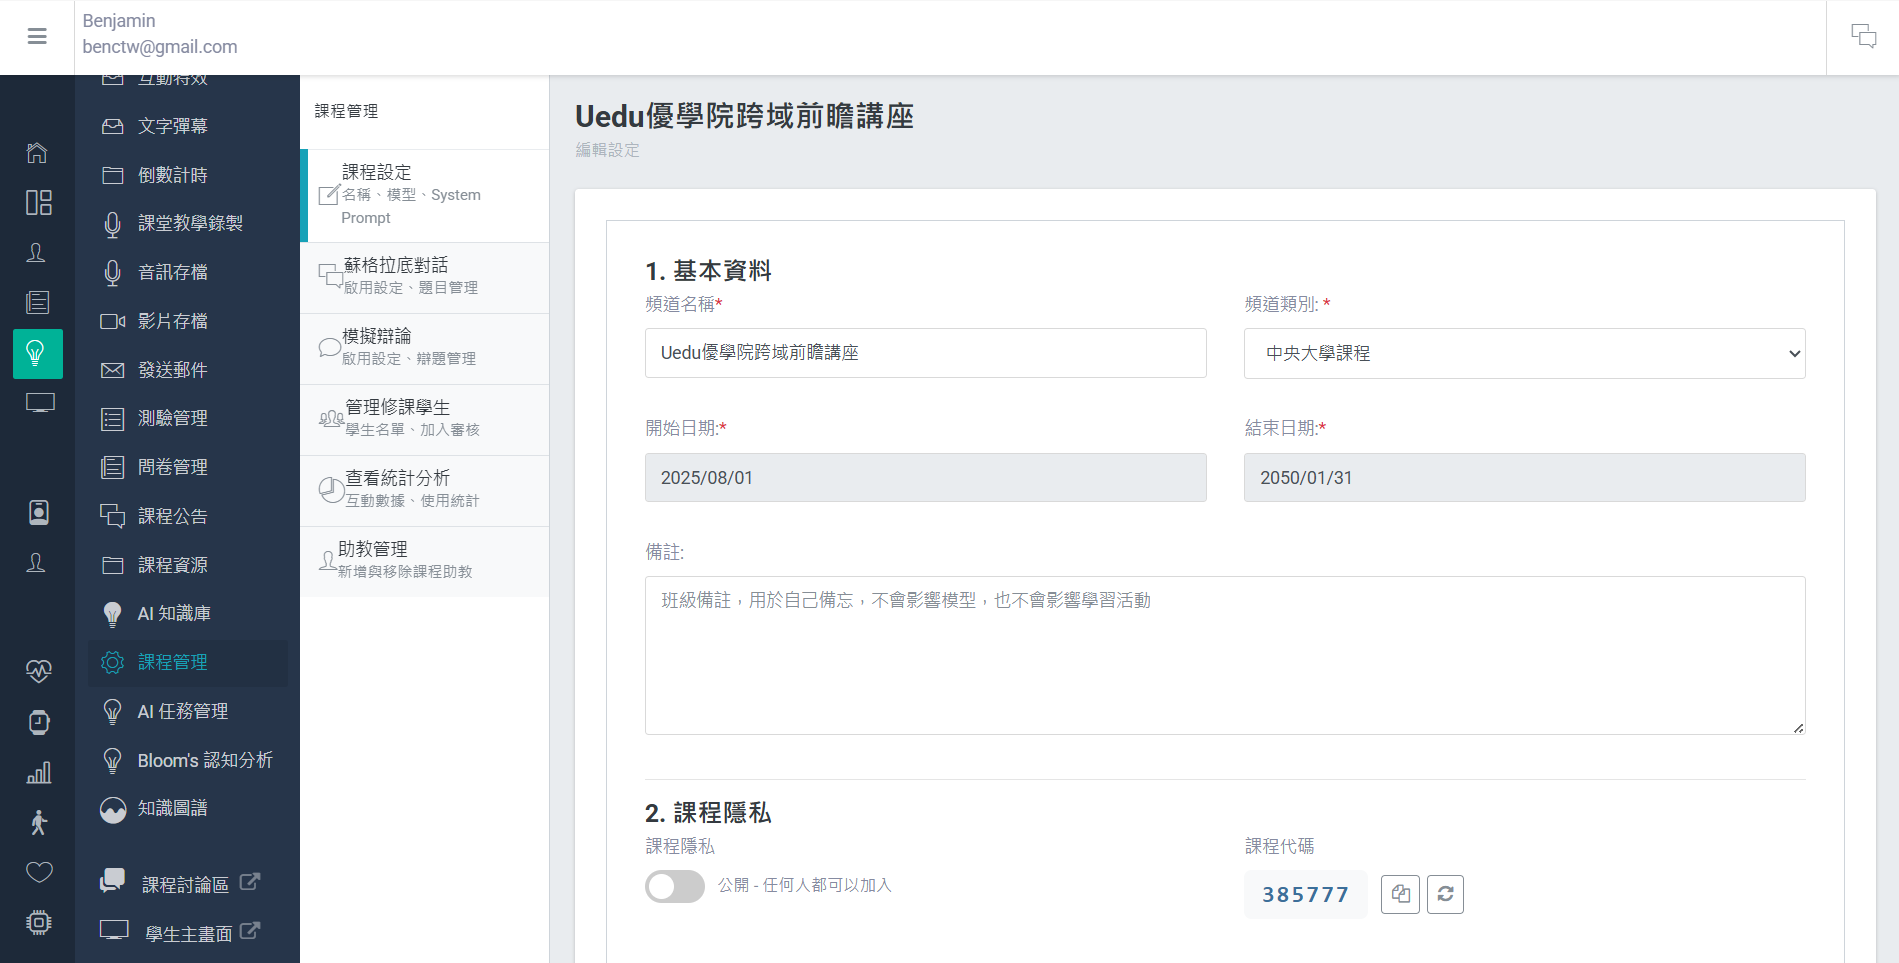
System Prompt is the most important setting for the AI teaching assistant; it determines the AI's 'persona' and behaviour.
A System Prompt is a hidden instruction text that defines the AI teaching assistant:
A good System Prompt should include the following elements:
If you provided a syllabus when creating the Course, the system will automatically generate a System Prompt. You can fine-tune it from there; there is no need to start from scratch.
The model settings are on the “Model and API Key” page in Teacher mode. The platform’s default model is GPT-5.6 Luna — available automatically across all courses, free, preselected in the student dropdown, with no setup required and no API Key needed. If a course needs a more powerful model or a different provider, you can enable advanced models on this page (the course must provide the relevant provider’s API Key):
| Model | Layer | Description |
|---|---|---|
| GPT-5.6 Luna | Lightweight (default) | The platform's default model balances speed and quality, suitable for most courses; free, no setup, no API Key |
| GPT-5.4 mini/nano | Lightweight (assistive) | A lightweight assistive option that does not require an API Key, enabled by default; can be turned off on the “Model and API Key” page |
| GPT-5.6 Terra | Balance | A more balanced advanced model; course must provide its own OpenAI API Key |
| GPT-5.6 Sol | Flagship | Strongest in reasoning, suitable for in-depth analysis and complex problem-solving; requires the Course to provide its own OpenAI API Key |
| GPT-5.5/GPT-5.4 | Advanced | Previous-generation advanced model; requires the Course to provide its own OpenAI API Key |
| Claude、Grok | Other suppliers | Claude Opus 4.8/Sonnet 5/Haiku 4.5, Grok 4.3; the course must provide the relevant vendors' API Key |
GPT-model systems can also set reasoning effort: the higher the effort, the more thorough the response, but the slower and more costly it is, so it can be adjusted according to the nature of the Course. Advanced models and those from other providers use BYOK — you must enter the Course's own OpenAI/Anthropic/xAI API keys on the "Models and API Key" page before they are opened to Students; usage costs are borne by that key. If not set, Students will always use the platform's free default model.
Most courses can remain on the platform's default GPT-5.6 Luna without any extra configuration. Only when stronger reasoning is needed (such as complex problem-solving or in-depth analysis) or when a specific provider is specified do you need to provide your own API Key to enable advanced models.
The AI TA has the following built-in functions, which are automatically enabled during conversation and do not require any additional setup by the Instructor:
When a Student asks a question that requires up-to-date information (such as the latest research, current news, technical documentation, etc.), the AI TA will automatically search the web and then answer using the latest information.
The web search function enables the AI TA to answer questions beyond the training data cut-off, such as "What new machine learning frameworks are there recently?" or "What has changed in the latest version of this package?".
Students can use natural language to ask the AI TA to search their past conversation records. The system uses semantic similarity matching, so related content can be found even if the wording is not exactly the same.
Conversation history search allows Students to quickly review content they have learnt before, and is especially suitable for mid-term and final revision. Instructors can remind Students to make good use of this feature.
On the edit page, you can also set:
Each Course has two privacy states:
| Status | Image | Description |
|---|---|---|
| Private | Lock icon | Students need a course code or instructor approval to join (default) |
| Public | Earth | Anyone can join directly via the link |
A newly claimed or created Course is set to private by default. Setting a Course to public means that anyone may join freely, so please use this with care.
Each private course has a 6-character alphanumeric code used for students to join the Course quickly.
Code features:
3AKR7NOn the Course Management page, you can:
https://uedu.tw/goto/{代碼}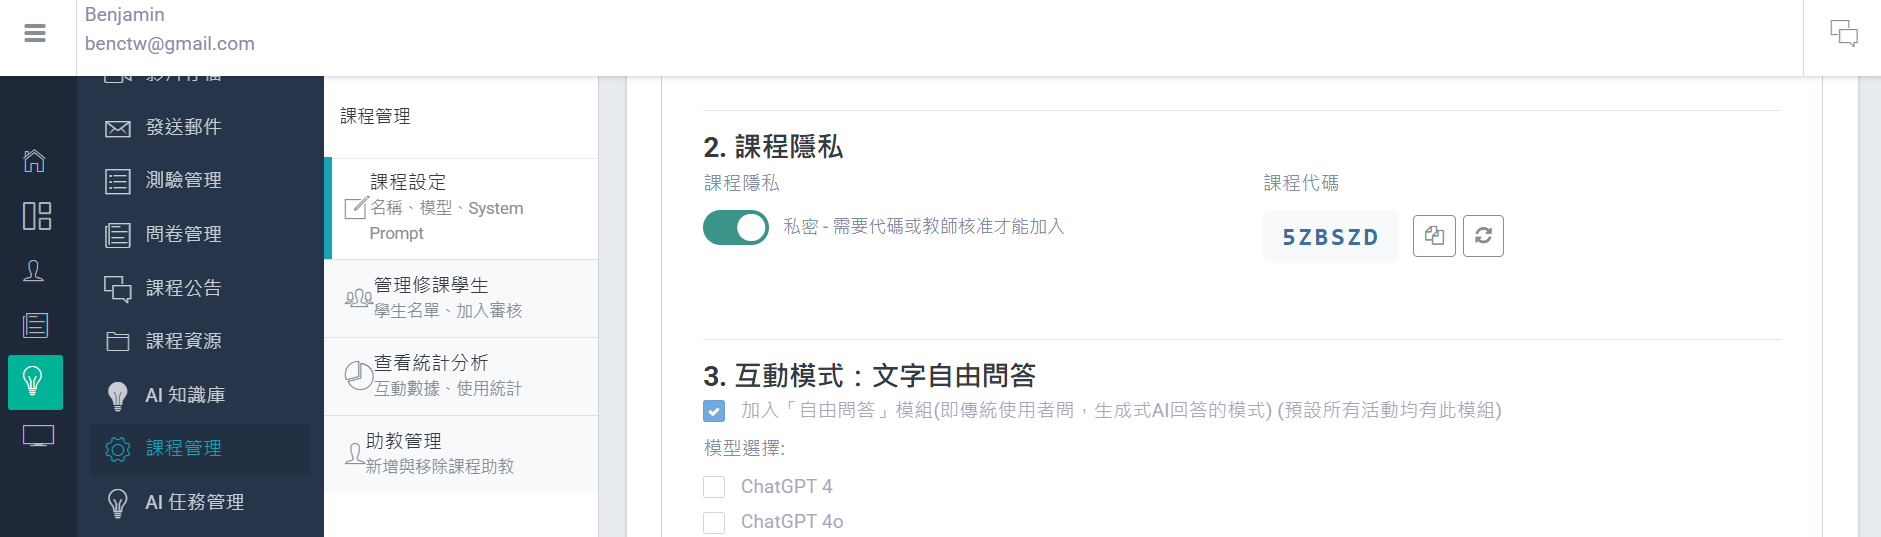
After generating a new code, the old code will become invalid immediately. Students who have not yet joined must use the new code. Students who have already joined will not be affected.
On the Course Management page, you can switch the course's public/private status at any time. Once switched to public, anyone can join directly via the course link, with no code or review required.
| Method | Condition | Process |
|---|---|---|
| By Code | Hold a course code | Enter the code → join directly |
| Auto-enrol from list | Student ID in the class list | Access link → auto-join |
| Application review | General students in a private Course | Submit application → Instructor approval |
| By Link | Public Course | Tap the link → Join directly |
The most common way is to share the course code:
https://uedu.tw/goto/{代碼} into the Course announcement, slides, or chat groupThe page where students enter code automatically converts lowercase letters to uppercase, reducing input errors.
To prevent brute-force guessing, each account is allowed a maximum of 10 incorrect code entries per hour. After the limit is exceeded, you must wait one hour.
If you have a list of students' student numbers, you can import them into the system in advance:
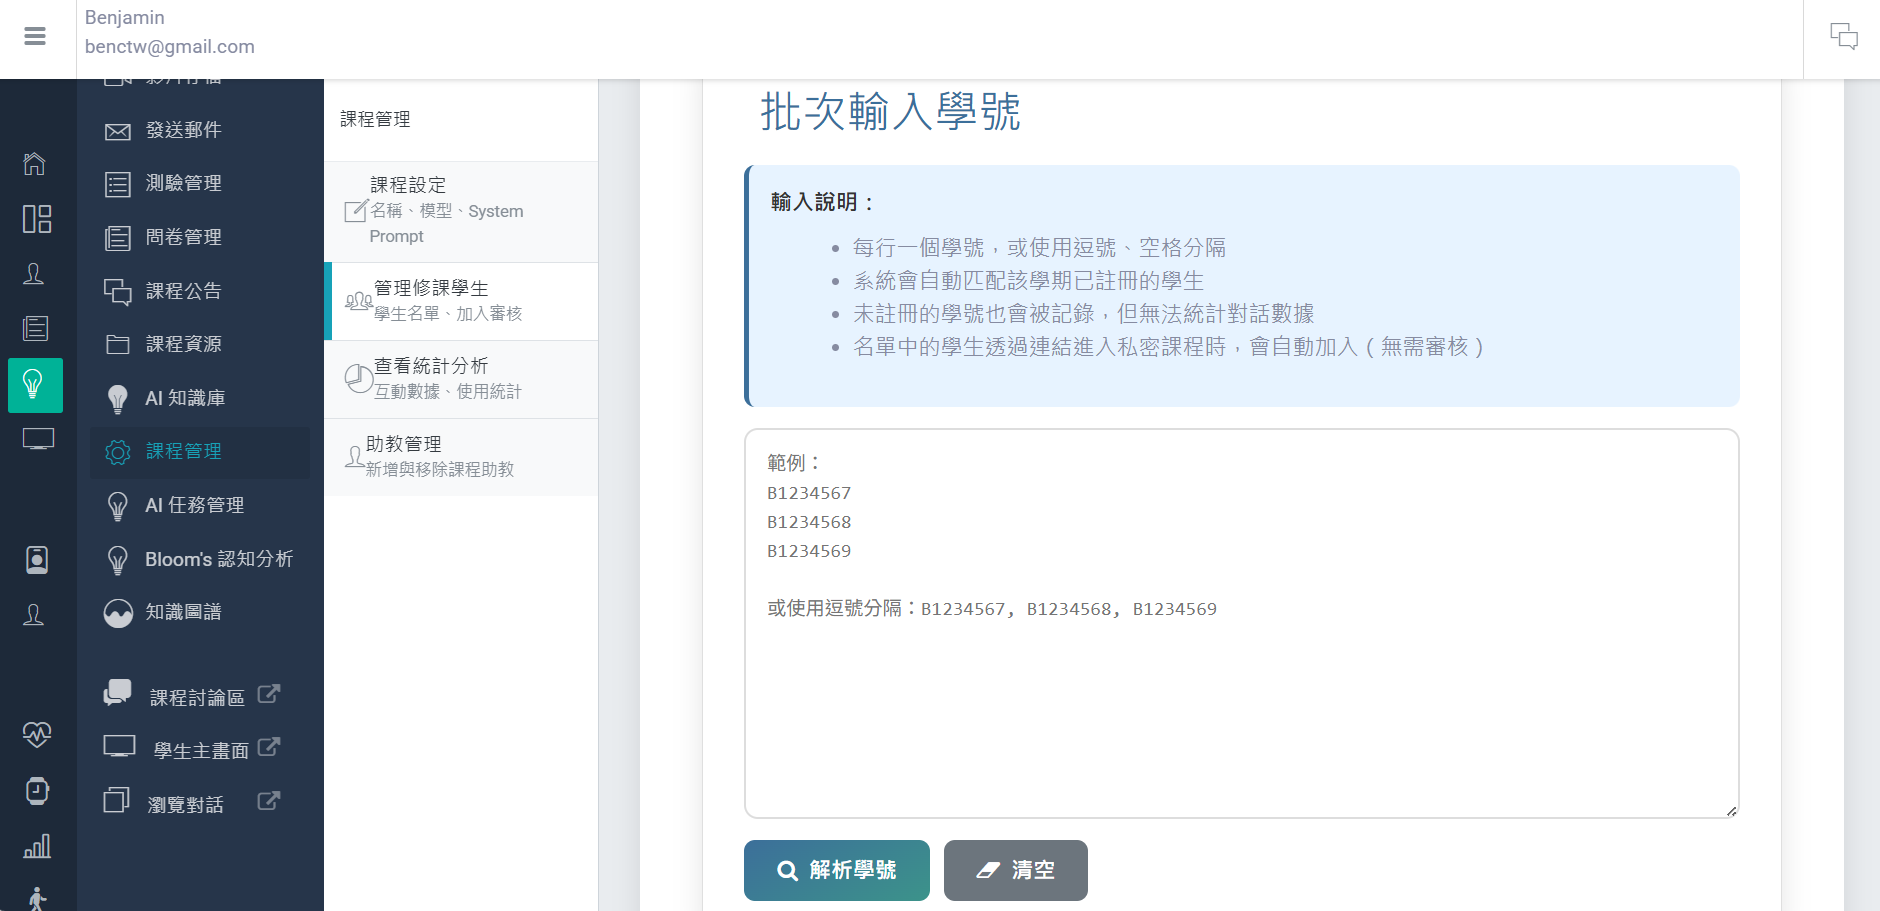
When a private Course has Students submitting join requests:
TAs also have permission to review join requests and manage members; you can delegate this task to TAs.
To remove a Student from a Course:
Removed students will receive an email notification and will not be able to rejoin via the public link (reapplication required).
Teachers can project a QR Code in class so that Students can scan it with their phones to join the Course quickly:
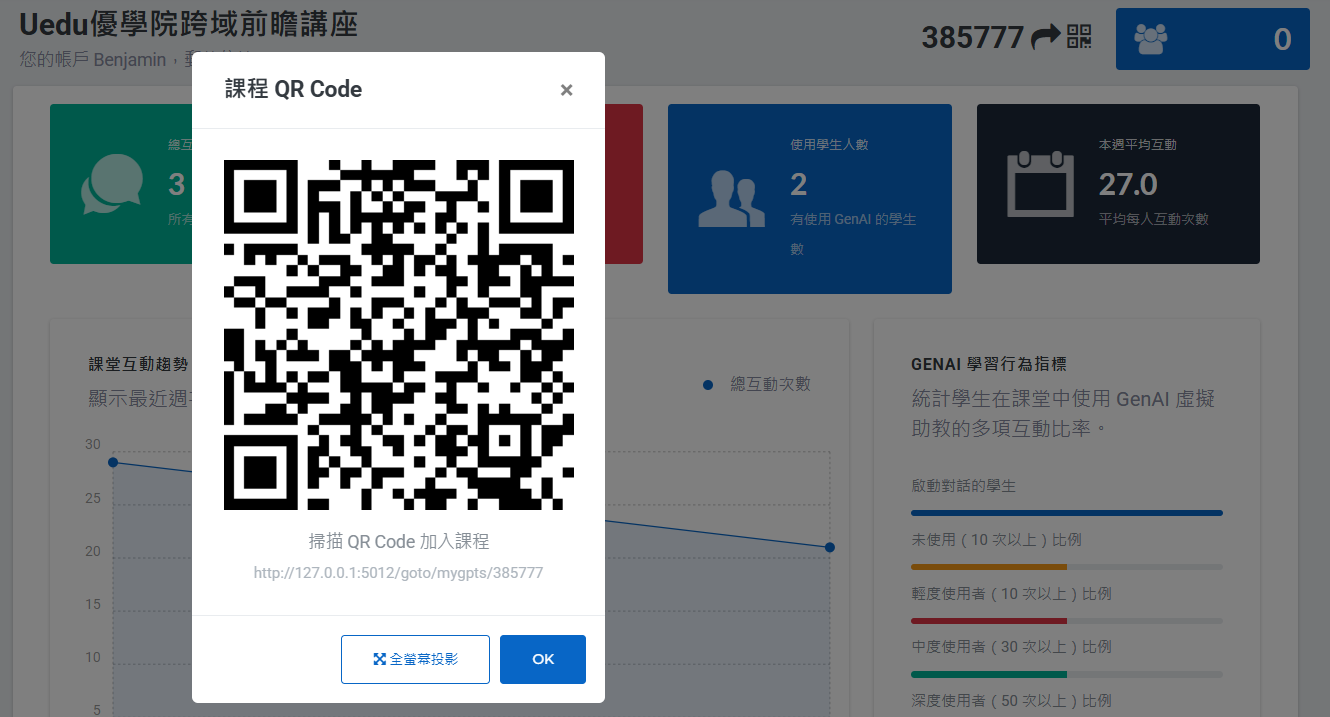
QR Code is especially suitable for use in the first class of a physical classroom; Students only need to scan the code to join quickly, with no need to enter a code manually.
Click "Teaching Toolkit" → "Teacher Console" from the left-hand menu to see an overview of all your Courses.
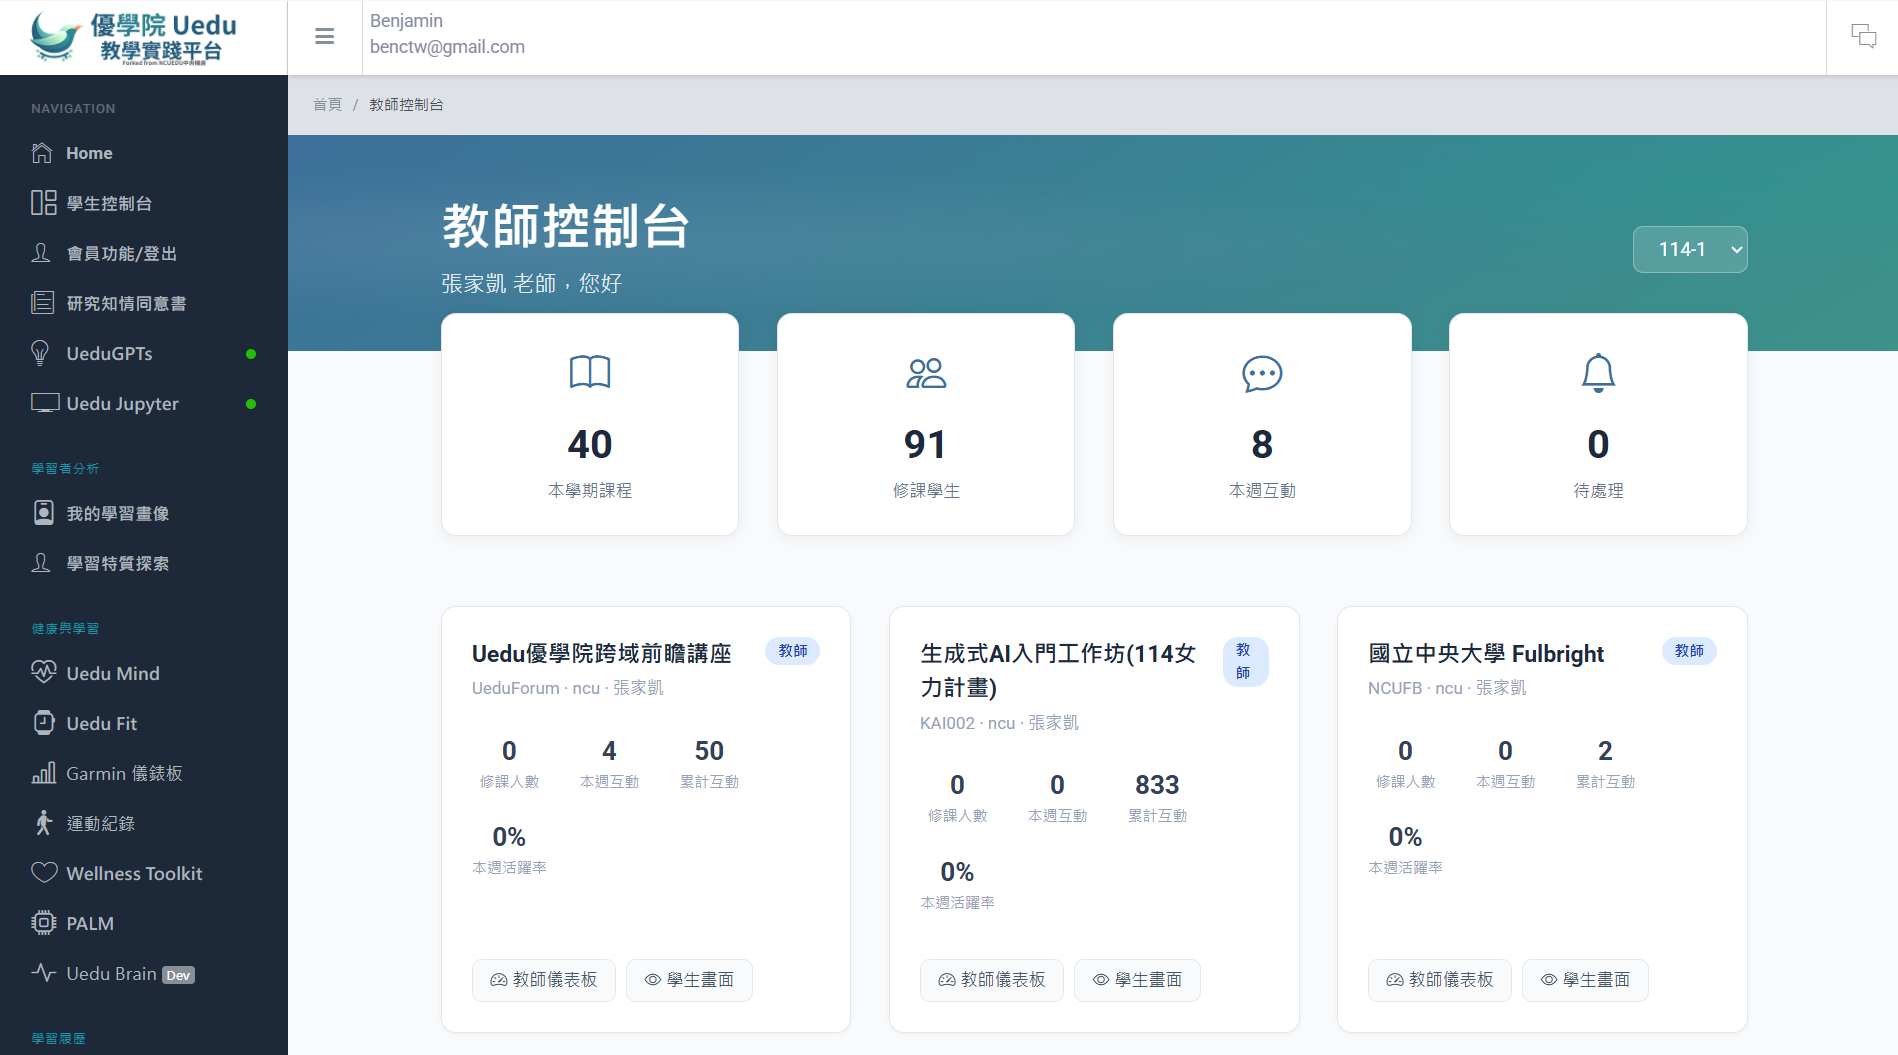
Four summary statistics are shown at the top of the page:
| Statistical items | Description |
|---|---|
| Number of courses this semester | The total number of courses you have in the current semester |
| Total students | Total number of enrolled Students across all Courses |
| Number of interactions this week | The number of interactions between students and the AI TA in the past 7 days |
| Application pending review | Number of pending student join requests |
Each Course is presented as cards, including:
The term dropdown at the top of the page lets you switch between courses in different terms.
After clicking the "Enter Course" button for any course in the Teacher Console, you will enter that course's Instructor Mode page. The course statistics panel is shown by default, including:
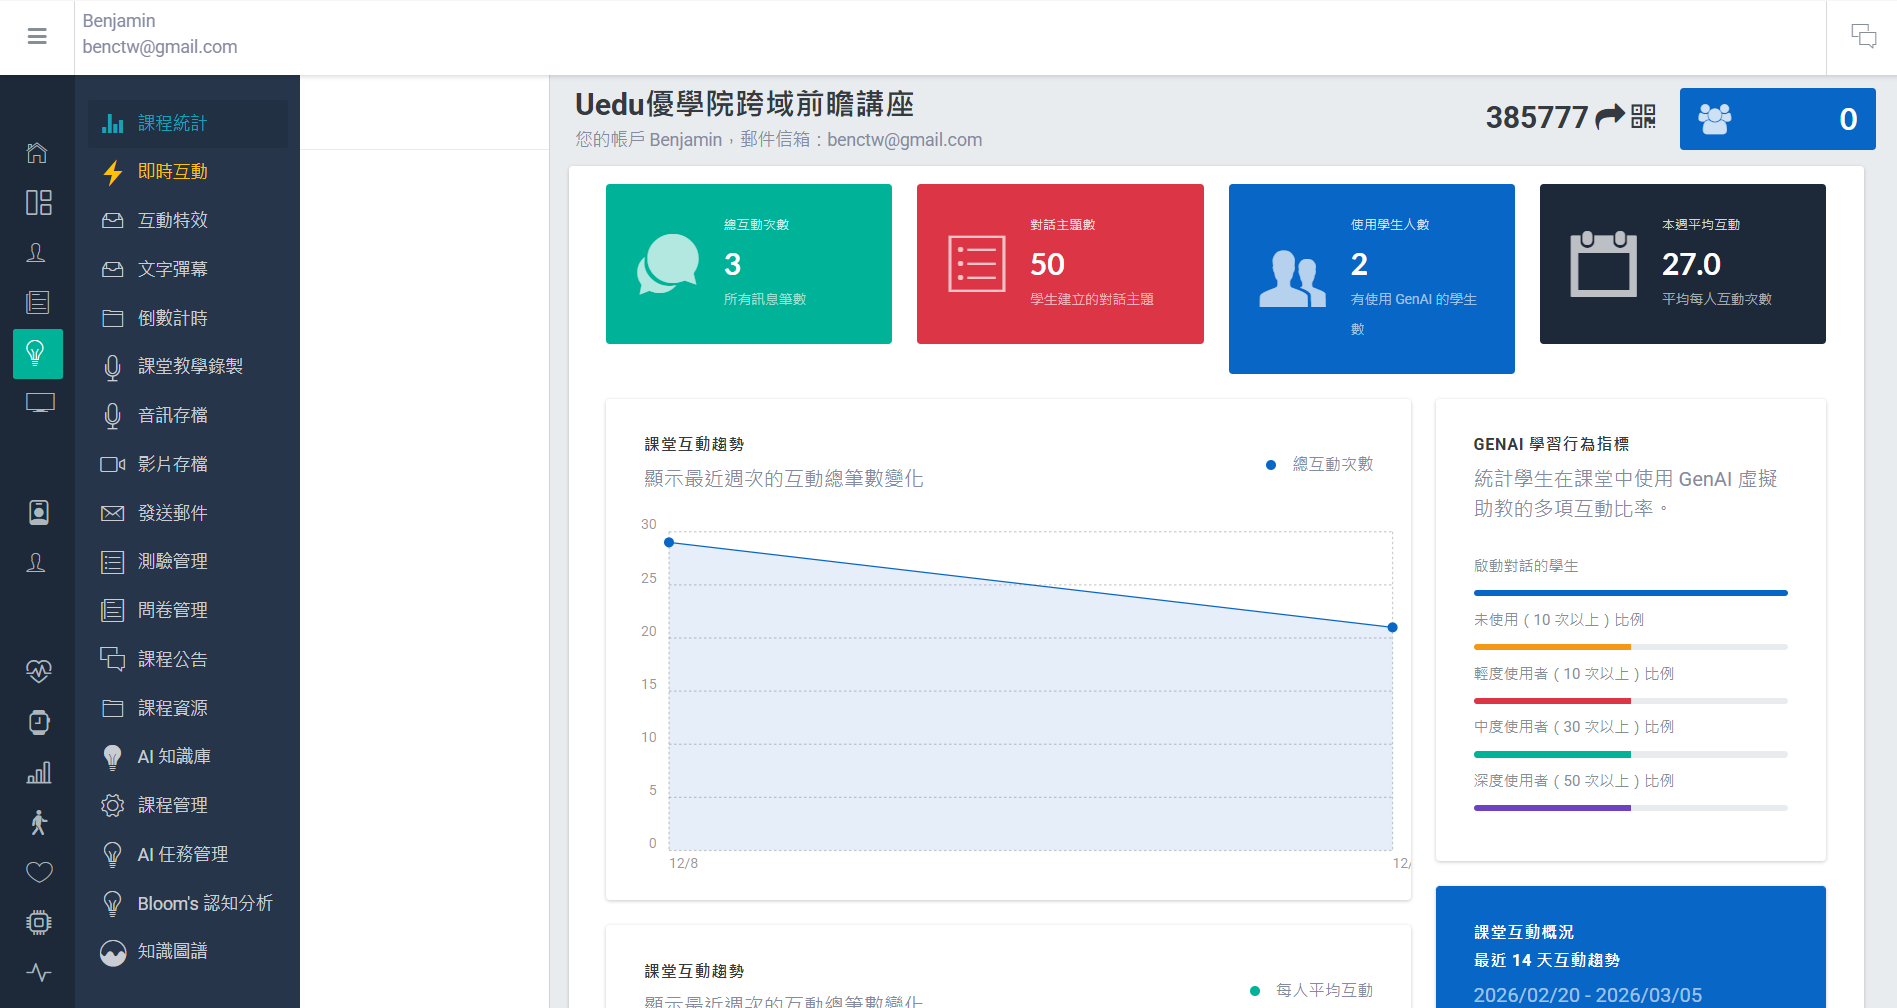
The left sidebar lists all available functional modules (such as Quiz, Survey, recording, Forum, Bloom's analysis, etc.); click to switch to a different function page.
This chapter provides a brief introduction to Uedu’s main teaching function modules. For full operating instructions, please refer to the detailed manual for each module.
Uedu's quiz system supports both AI automatic question generation and manual question authoring, making it suitable for in-class quizzes, mid-term and final assessments, and similar scenarios.
Main functions:
Basic workflow:
The AI question-generation function can automatically generate questions from the lecture notes or textbook content you upload. The more specific the materials you provide, the better the generated questions will be.
Create an in-class survey, teaching evaluation, or learning survey.
Main functions:
Basic workflow:
Publish announcement messages and attachments to enrolled Students.
Main functions:
Record the classroom screen, webcam video and audio for playback after class.
Recording type:
| Type | Source | Purpose |
|---|---|---|
| Audio recording | Microphone | Real-time speech captions, replay after class |
| Screen Recording | Screen display | Record slideshow playback |
| Webcam Recordings | Camera | Record Instructor video |
When recording the class, please inform the Student in advance. The recorded audio and video files will be stored on the server.
When the Instructor starts audio recording, the system will automatically use AI speech recognition (Whisper) to convert the Instructor’s spoken words into live captions, synchronised and pushed to the screens of all connected Students.
Real-time captions are especially suitable for large classrooms, students with hearing impairments, or EMI (English-medium instruction) courses, helping students understand the teaching content in real time.
The recorded video and audio will be saved automatically, and the Instructor can manage them in "Video archive" and "Audio archive" in the teacher mode sidebar:
Create an online discussion space for a Course, enabling Students to engage in topic-based discussion, peer interaction and reflective writing.
Main functions:
Scoring mechanism (customisable):
| Action | Default allocation | Description |
|---|---|---|
| Publish post | 3 min | Write a new discussion topic |
| Reply post | 1 point | Reply to other people's discussions |
| Teacher emoji bonus points | +1 ~ +5 | Extra rewards given by the instructor for high-quality posts |
Basic workflow:
Instructors and TAs can use special Emoji to award extra points: (+1), (+3), (+5). Only Emoji from instructors and TAs count towards the score; students' Emoji do not affect scoring.
If your Course has a designated textbook or handouts, you can upload the teaching materials to the AI knowledge base, allowing the AI TA to automatically refer to the Course materials when answering Student questions rather than relying only on general knowledge. This feature is particularly suitable for Courses with specific teaching materials.
The uploaded course materials are for AI reference only; Students cannot download the original files. Please ensure you have the right to use the materials (for example, self-authored handouts or openly licensed materials) to avoid copyright infringement.
Supported formats and restrictions:
| Format | Maximum file size |
|---|---|
| 50 MB | |
| DOCX(Word) | 50 MB |
| PPTX(PowerPoint) | 50 MB |
How it works:
Basic workflow:
After uploading course materials, we recommend using the 'Test retrieval' function. Enter a few common Student questions to check that AI can cite the course material correctly before making it available to Students.
Instructors can add TAs to a Course to help manage course matters.
What TA can do:
What TA cannot do:
Process:
The TA must first register an account on the Uedu platform before they can be added as a TA. It is recommended that the TA complete registration and 2FA settings first.
Instructors can send emails directly through the platform to Students enrolled on the Course, suitable for course announcements, assignment reminders, and more.
Main functions:
Recipient options:
| Options | Description |
|---|---|
| All active Students | Includes all students on the course roster, those who have chatted with AI, taken a Quiz or Survey, or posted (recommended) |
| Enrolled students only | Send only to students formally enrolled in the course |
Process:
Instructors can assign an "AI interactive assignment", allowing Students to carry out a structured dialogue task with AI, which is then automatically marked by the system or manually marked by the Instructor.
Example assignment mode:
Grading method:
| Method | Description |
|---|---|
| Automatic grading | AI automatic grading according to the scoring criteria |
| Manual Grading | Instructor reviews each Student conversation and assigns scores |
| Hybrid mode | AI is automatically graded first, then the Instructor reviews and adjusts it (default) |
Process:
We recommend choosing “mixed mode” grading, so AI gives an initial grade first and the Instructor then reviews the parts that need adjustment, which can greatly reduce marking time.
Uedu provides a range of real-time classroom interaction tools, allowing Instructors to engage in live interaction with Students during teaching. All interaction tools are enabled in the 'Real-time Interaction' section of the Instructor mode sidebar.
Teachers can launch live polls in class, and Students answer instantly on their phones or computers, with results displayed in real time.
Students can submit questions anonymously to the Q&A wall, and the Instructor reviews and responds on the big screen.
After the instructor asks a question, students enter keywords and the system generates a word cloud in real time; terms with higher frequency appear larger.
Instructors can push visual effects to all Students’ screens:
These interactive tools do not require any additional software installation; Students only need to open the Course page in a browser to receive them.
Teachers can upload files and add external links in the Course as learning resources for Students.
Main functions:
Process:
Course resources and the AI knowledge base (RAG) are different features. Course resources are materials that students can download or view directly; the AI knowledge base is internal knowledge for the AI assistant to reference, and students cannot download the original files. If you need to describe the technical method of RAG in a paper, please refer to RAG Teaching Material Retrieval-Augmented Methodology。
The platform also provides 96 browser-based scientific simulations (physics 46, earth science 31, chemistry 10, biology 9), which can be linked directly in Course resources or assignment instructions, with no extra installation required and no login needed for Students to use them.
How can it be used:
Process:
The mock page sidebar includes an AI experiment assistant. It can read the simulation state in front of the Student and ask about specific parameters. By design, it does not replace the Student in drawing graphs or in writing explanations, because generating and interpreting representations is itself a learning objective. See the design rationale and classroom use guide for details The educational implications of Uedu Science。
Instructors can view the full dialogue records between all Students and the AI TA, to understand Students’ learning status and common questions.
Usage:
Browsing student dialogue records involves personal data; please use them for teaching purposes only. Under the Personal Data Protection Act, instructors have a duty to safeguard and keep confidential the student data they access.
Uedu offers three major open-source psychological scales, enabling Students to understand their own traits through self-assessment and helping Instructors understand Students' learning styles and personality tendencies.
3 major scales:
| Rating scale | Number of Questions | Result format | Purpose |
|---|---|---|---|
| Holland RIASEC | 48 items | Three-code type (e.g. RIA) | Career interest exploration |
| IPIP Big Five | 50 questions | Five-dimensional percentage | Personality trait analysis |
| OEJTS(MBTI) | 32 questions | Four-letter code (e.g. ENFJ) | Understanding Cognitive Style |
It is recommended that students complete three scales at the start of the semester; the results can be used as a reference for teaching design. The scale page is https://uedu.tw/profiling/, and the Instructor may share the link with students.
The AI learning profile feature automatically integrates multi-dimensional learning data of Students on the Uedu platform and uses AI to generate a cross-course learner description, enabling the AI Teaching Assistant to respond to each Student more personally.
Integrated data sources:
Outputs:
The profile is automatically updated every 24 hours; if learning data do not change, the cache is extended. Students may at any time visit https://uedu.tw/learning-profile/ to view it or manually regenerate.
The Learning history file (Portfolio) records all Student achievements on Uedu and presents the growth journey using the Taiwan mountain rating system.
Core functions:
Students can enter from the left-hand menu, or go directly to https://uedu.tw/portfolio/.
Achievements in the Learning history file will be checked automatically after Students complete each activity, with no need for manual action by the Instructor. Instructors can remind Students to review their own growth records.
https://uedu.tw/rag-toolkit/ This page provides a complete introduction to and user guide for the AI knowledge base feature, helping Instructors quickly understand the workflow of "upload teaching materials → AI reads the content → AI answers Student questions based on the materials".
Instructors can share this page link with other Instructors for reference, or read it themselves to understand how to make good use of the AI knowledge base to improve the quality of the AI TA’s responses.
https://uedu.tw/forum-toolkit/ This page provides a complete guide to Forum functionality, divided into Instructor and Student versions:
Instructors can share the student version link with Students on the Course to help them get started with the Forum quickly.
Uedu Note is the platform's built-in Markdown collaborative editor, supporting teacher co-preparation and students' in-class notes. Feature introduction page: https://uedu.tw/editor/intro
Main functions:
Use case:
| Context | Entry point | Description |
|---|---|---|
| Personal notes | Side bar "Uedu Note" | Personal draft and notes space |
| Student notes from class | "My notes" card on the classroom page | Notes created by students in class that instructors can view |
| Instructor course documents | Instructor mode "Course Files" tab | Can be set to private / whole-class co-edit / whole-class read-only |
| Send template | Instructor mode "Course Files" → "Send Template" | Send a document template to everyone in the class with one click, one copy each |
| Instructor Community co-planning | Instructor Community Dashboard "Co-authored Documents" tab | Community members automatically have editing rights |
The teacher community enables teachers across institutions to co-plan, share materials, and drive teaching improvement with data. Go to https://uedu.tw/community to create or join a community.
Core functions:
Usage:
Uedu includes a range of learning analytics tools built in, helping instructors understand students' cognitive development and Learning history, while also supporting data export for academic research.
If you need to describe the methodology behind Uedu's various analytical functions in an academic paper, please refer to Methodology document directory, and contains full technical explanations and suggested research citations.
The system automatically analyses the conversation between each Student and the AI TA, and determines the cognitive level shown in the conversation (based on Bloom's Taxonomy revised edition).
Bloom's Taxonomy six cognitive levels (from low to high):
| Level | Name | Description |
|---|---|---|
| 1 | Remember | Recall and recognise factual knowledge |
| 2 | Understanding (Understand) | Explain, give examples, and summarise |
| 3 | Apply | Apply knowledge to new contexts |
| 4 | Analysis | Differentiation, organisation, attribution |
| 5 | Appraisal (Evaluate) | Judge, criticise, justify |
| 6 | Create | Generate, plan, design |
Analysis content visible to the Instructor:
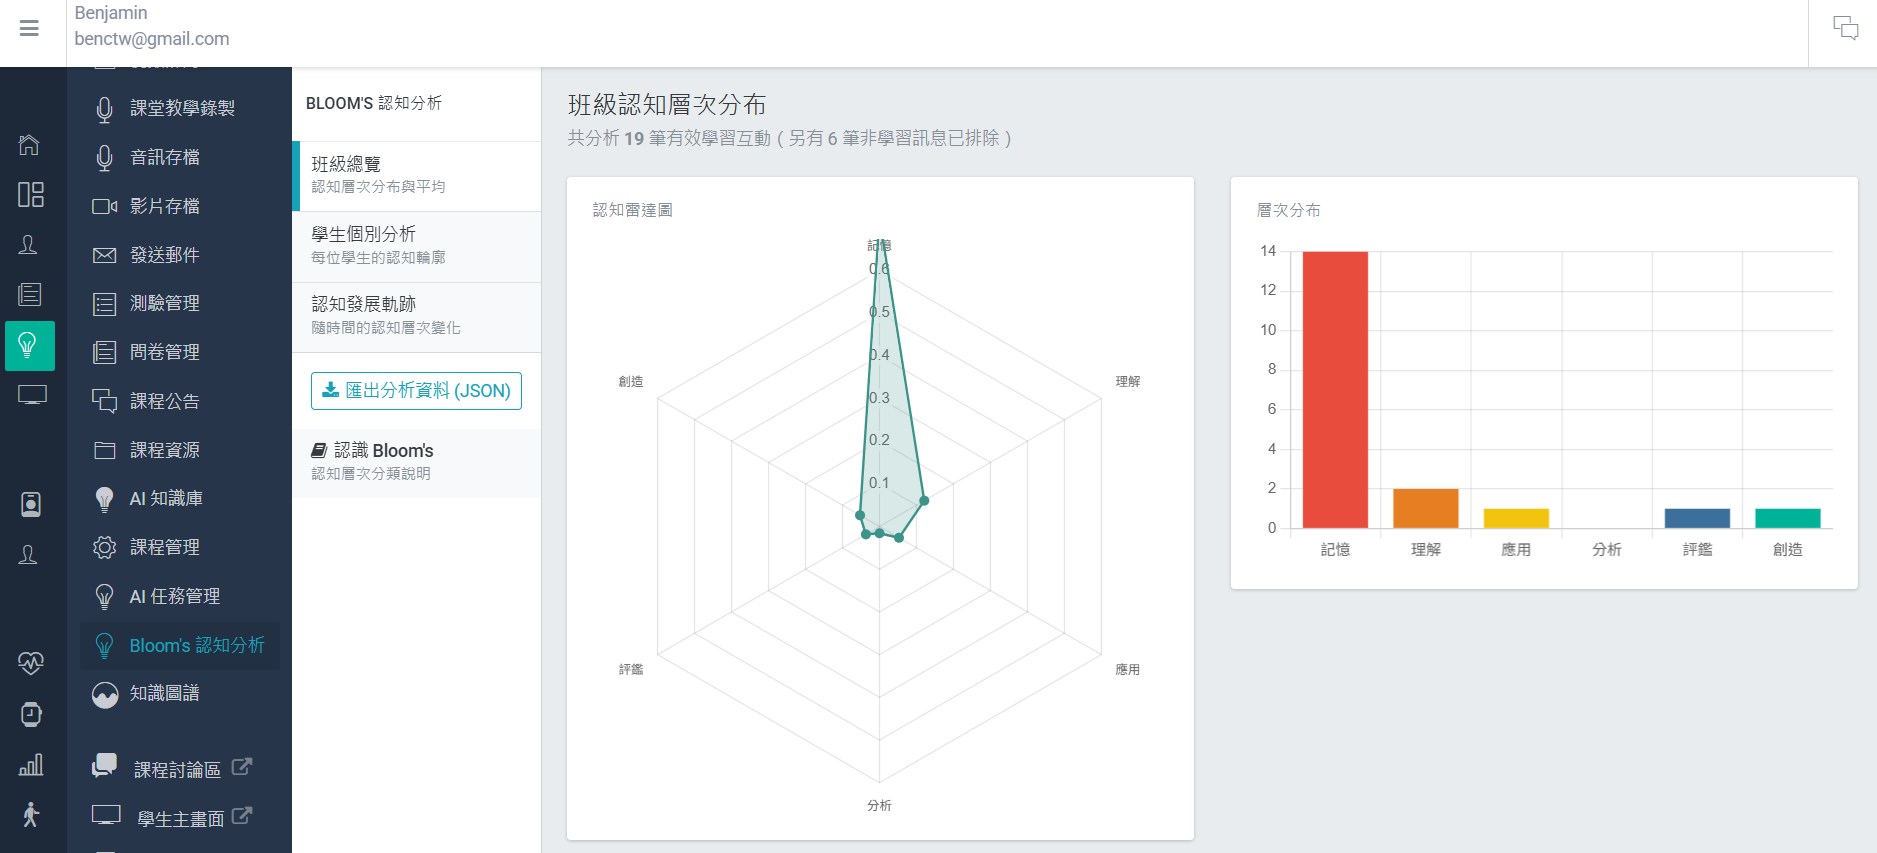
Usage:
Bloom's analysis is executed asynchronously and does not affect the Student's conversation experience. The analysis usually completes within a few seconds after the Student sends a message. If you need to describe the methodology of this analysis in a paper, please refer to Bloom's Taxonomy cognitive level analysis methodology。
The Knowledge Graph feature can automatically extract concepts and relationships from course materials (AI knowledge base), build a visual knowledge structure map, and track each Student's mastery of each concept.
Features:
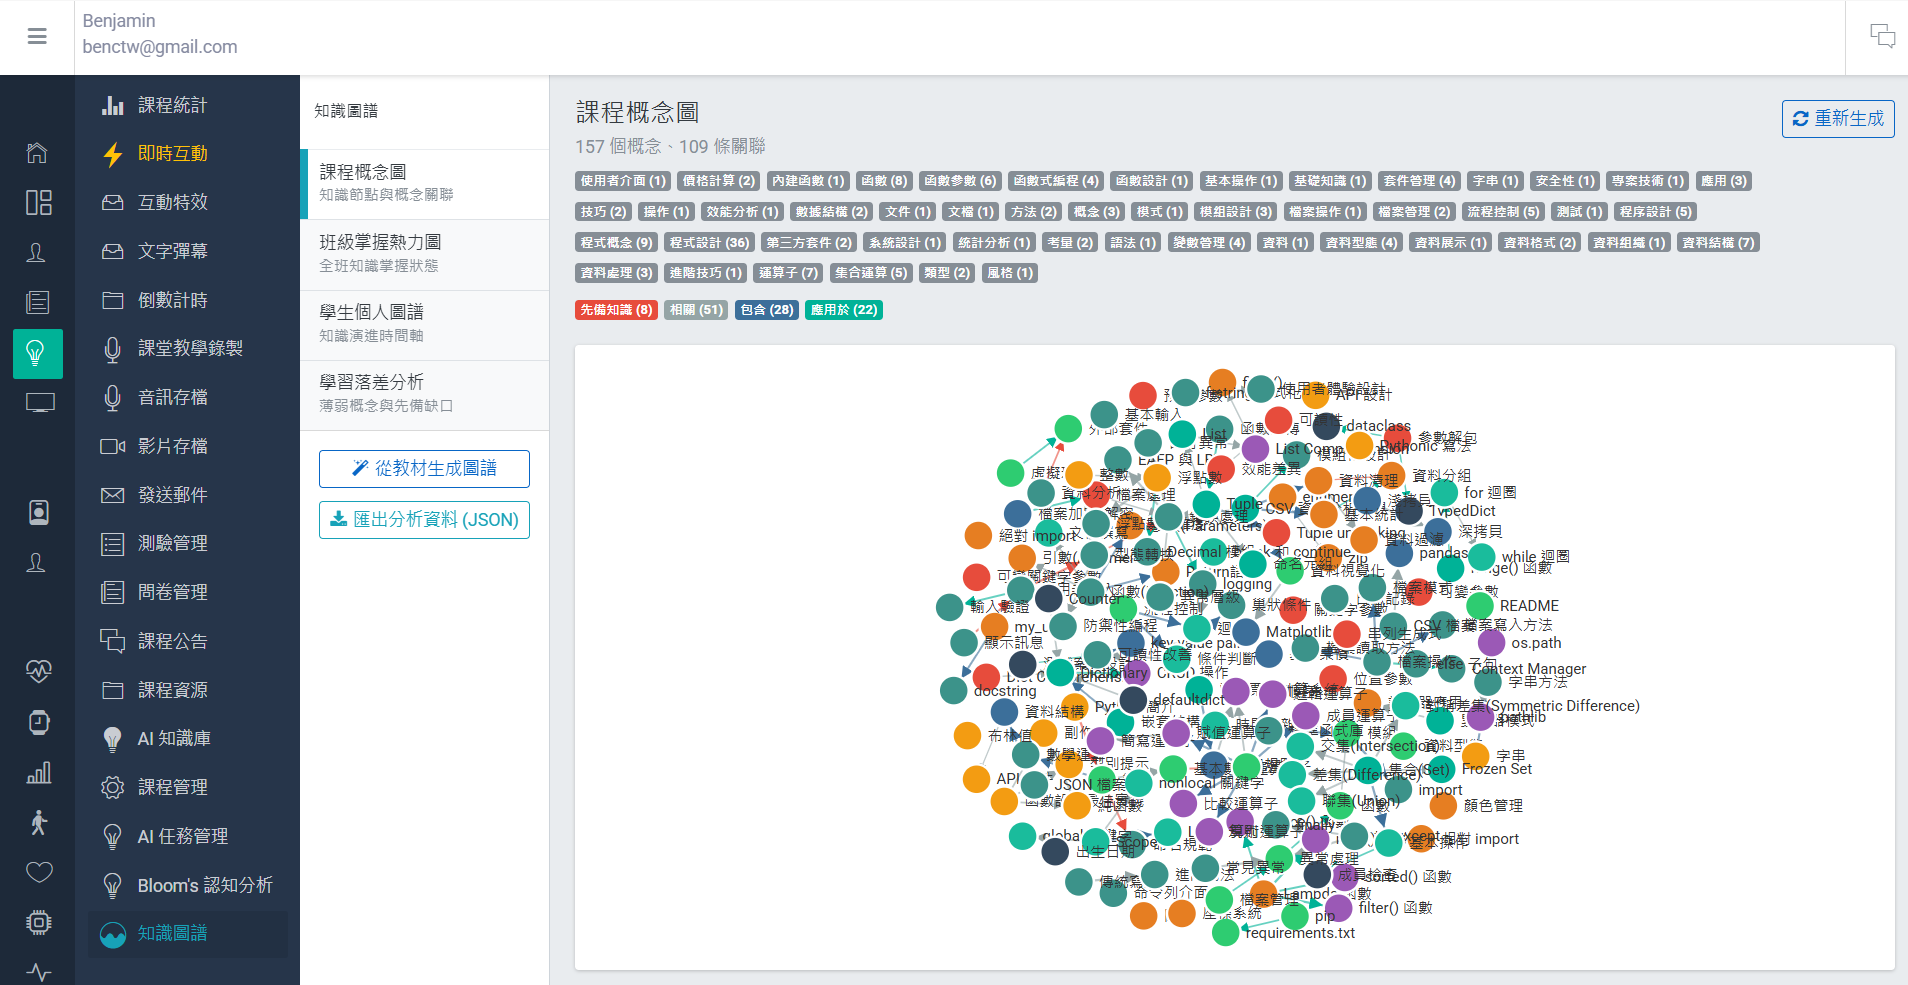
Usage:
The Knowledge Graph requires course materials to be uploaded to the AI Knowledge Base before it can be used. If the Course has not yet uploaded any materials, this function will not be able to generate a Knowledge Graph. If you need to describe the technical method of the Knowledge Graph in a paper, please refer to Knowledge Graph Analytics Methodology。
Teachers can export complete conversation records between Students and the AI TA for teaching research or learning analytics.
Export format:
Process:
Exported conversation data is the Student's personal data and is protected under the Personal Data Protection Act. Once the Instructor has signed the Data Protection Responsibility Letter, they assume the obligations of data custody, lawful use and secure destruction. Please do not share exported data with unauthorised third parties.
If you need to let TAs export data too (for example, research assistants), the Instructor can authorise a specific TA as a "super TA":
Super TA permissions give TAs the ability to access student conversation data; please authorise only trusted personnel and confirm they understand their data protection obligations.
Instructors hold both the "grade assessment power" and the ability to "view learning data". Here there is only one platform-level prohibition; everything else falls under your teaching autonomy:
Research participation (signing the research consent form, data used for academic research) is completely decoupled from course grades. If a Student does not sign or withdraws consent midway, the course continues, AI continues, and grades continue to be counted — only their data is excluded from research. Any practice such as "signing the consent form for extra marks" or "participation in research is required to take the course" is a serious breach of research ethics: when there is an imbalance of power between Instructor and Student, "voluntary" based on grades is not valid. In recent years, there have already been major misconduct cases in Taiwan in which teachers and researchers required Students to participate in research for credits — individuals were dismissed and suspended, and institutions were fined and required to repay funding.
Usage scoring = your teaching autonomy. Requiring Students to use AI conversations, take part in discussions and include this in grades is in the same category as "assignment submission scoring" and "in-class speaking scoring"; it falls within instructional design and is neither prohibited nor mandated by the platform. The platform's role is to provide data and quality signals; how you use and convert them is up to you.
Pure dialogue counts or word counts are easy to inflate with spam, so the platform provides quality-adjusted metrics for this purpose; we recommend using the following first:
Two practical reminders (recommendations, not requirements):
The hardest part of the above “advance notice” practice in reality is writing “how far it may be used” in a way that even TA can judge accurately. AI Usage Guidelines Generator first lets you complete a five-question self-assessment of governance maturity, then generates a chapter-by-chapter draft of the guidelines based on the course context, including usage levels for various assignments mapped to L0–L4, the disclosure method for each level, and the procedure for determining improper use. The output can be printed or saved as a PDF and placed directly into the syllabus.
When a school, faculty or department needs to set a policy for the whole unit, simply choose "Institutional Level" in the same tool. The output is a draft and may only be implemented after passing your unit's established review process.
The Uedu team continues to publish academic papers, documenting the research theories and empirical data behind the platform's features. Teachers can browse all academic papers related to Uedu through https://uedu.tw/practice/ and understand the research basis for each feature.
The published papers currently cover the following topics:
The papers are included in international academic conferences such as IEEE ICALT, LAK and ICMET. Instructors may go to https://uedu.tw/practice/ to view the full list; each paper page includes a DOI link and an introduction to the corresponding Uedu feature.
If you have used data or features from the Uedu platform in teaching research, you are welcome to cite the relevant paper. The paper page provides the full citation format.
The Uedu team holds a monthly online teaching practice research meetup, inviting instructors using Uedu to share teaching experience, research insights and data analysis methods.
Little gathering features:
For the latest activity updates, please follow https://uedu.tw/practice/ or announcements on the Uedu platform.
All accounts with Instructor, TA or system administrator privileges must enable two-factor authentication. This is a mandatory security policy of the platform; before 2FA is set up, the system will restrict access to other functions.
Instructor accounts can access students' AI conversation records, learning history, grades and other personal data. Under Articles 18 and 20-1 of the Personal Data Protection Act, the platform is obliged to implement appropriate security measures. Two-step verification ensures the account remains secure even if the password is leaked.
Please first install an authenticator app on your phone (choose any one):
A3K7-M9P2)Please make sure you store the 10 recovery codes in a safe place (a password manager, or printed on paper and kept somewhere secure). Each recovery code can only be used once. If you lose your phone and have used up all recovery codes, you will need to restore access through the email reset process (with a 24-hour cooling-off period).
After enabling 2FA, each login will:
TOTP codes refresh every 30 seconds. If the code is about to expire (less than 5 seconds remaining), it is recommended to wait for the new code before entering it.
Go to https://uedu.tw/2fa/settings to:
Instructor accounts cannot disable 2FA while the instructor status is active. This is a mandatory platform security policy requirement.
Security restriction: after 5 consecutive incorrect input attempts, the account will be locked for 15 minutes.
In addition to AI teaching assistants and Quiz/Survey tools, Uedu provides full Course Management (LMS) functions: assignment submission and marking, group collaboration, attendance and leave requests, the Gradebook and semester final marks, the course calendar, as well as a suite of real-time interactive tools designed for use in the classroom. This chapter introduces them in the order of "from the start of term to the end of term". Unless otherwise stated, the following functions are all located in the Teacher Console sidebar, and are only available for formal semester courses.
| Stage | Feature | Side bar location / path |
|---|---|---|
| Before the semester starts | Course duplication, Course unit | Assignment upload → Import from old course; course units |
| During the term | Assignments, marking, groups, attendance, leave | Assignment upload; group management; attendance check-in |
| In class | Quick Q&A, random calling, live feedback | Live mode in class (/live/course ID) |
| End of semester | Gradebook, semester final grades | Course gradebook |
| Entire semester | Course calendar, notifications centre | Course calendar; bell icon at the top right |
When a new semester starts, you do not need to rebuild your teaching design. In the import function under "Assignment Upload", select a previous Course you have taught to copy assignments (including settings), grading rubrics, group scheme structures and custom calendar events in one go. All copied items are created as drafts, and the dates will be shifted in bulk by the number of days you specify — once you have confirmed the adjustments, publish them one by one; last year's deadline will not be accidentally opened to Students.
"Course unit" lets you organise teaching activities scattered across Quizzes, Surveys, Worksheets and Assignments into orderly modules by week or topic. On the student-facing course page, they appear in unit order at the top, and clicking takes students directly to the relevant activity. Units can be set to hidden (not revealed while being prepared), and deleted activities are automatically hidden from students and marked "inactive" for instructors.
'Assignment Upload' is the course assignment submission inbox. Each assignment can be set with opening and closing times, allowed file types and sizes (100MB per file maximum), and a submission mode (individual or group). There are three levels of handling after the deadline:
You can create multi-criteria, multi-level rubrics and attach them to assignments. Students can view the grading criteria before submitting; when marking, you click the level for each criterion and the total score is calculated automatically. After returning the work, Students see itemised rubric feedback. The same rubric can be reused across multiple assignments.
The marking page is categorised by 'To be marked / Marked / Returned / Not submitted'. PDF, image and plain text files can be previewed directly online without downloading. Students cannot see scores and feedback before you click 'Return'; you can also return everything in bulk. 'Similarity detection' compares text submissions in the Course pairwise — please note that similarity is only a clue for manual review (shared templates and citing the same data can both cause similarity). The platform does not perform AI-generated content detection, and we do not recommend using similarity percentages directly as evidence of plagiarism.
The 'Individual adjustment' option on the marking page can set an individual deadline for a specific Student (extension only). That Student's submission window follows this setting, and other Students are not affected. It is suitable for study-adjustment arrangements for Students with disabilities or for individual special circumstances; the reason for the adjustment is visible only to the Instructor, and the Student will only receive a notification that 'the deadline has been individually adjusted for you', balancing rights and privacy.
"Attendance check-in" generates a time-limited 6-digit check-in code (the large display is suitable for projection), which students enter on the course page to check in. After the window closes, you can manually adjust individual students to late, official leave or absent. Attendance rate can be set as a system source in the Gradebook (present = 1, late = 0.5, official leave excluded from the denominator).
Leave application process: a Student submits a leave request on the Course page's "attendance check-in" card (date + leave type + reason), and you approve or reject it in "leave review". After approval, any attendance record already present on that day is immediately marked as public leave, and attendance records starting afterwards on that day are also automatically marked as public leave — Students who have applied in advance no longer need to worry about being marked absent, and you do not need to manually amend each session.
"Course Gradebook" imports system sources such as Quizzes, Worksheets, Surveys, Forums, Assignments and attendance with one click; you can also add manual columns or import Excel. End-of-term workflow:
"Finalisation" and "Publication" are two separate steps: finalisation locks the score snapshot for you to check, and only after you confirm it is correct is it published to students. It can be unlocked and recalculated at any time before publication.
The side bar "Class Live Mode" (/live/Course ID) is a dark control console designed for projection and a second device. It can be operated from a mobile phone, iPad or classroom computer, and includes five tabs:
Perplexity and Exit Ticket are completely anonymous to the Instructor side (only statistics and shuffled text are visible), so Students are more willing to give honest feedback; the hand-raising queue is named, making it easier for you to call on people. The two are designed for different purposes, and this can be explained to Students to build trust.
"Course Calendar" automatically aggregates the schedules for Quizzes, Surveys, Worksheets, Assignments, AI tasks and attendance-taking; you can also add custom events (such as mid-term exams or off-campus visits). Both students and instructors can use a iCal subscription link to add the course schedule to Google Calendar, Apple Calendar or Outlook, and schedule updates will sync automatically.
The notification bell in the top right aggregates site events: Students submitting assignments, pending leave requests, grade returns, leave review results, deadline reminders, and more. Click to go directly to the relevant page.
The following lists the page paths teachers use most often (using uedu.tw as an example):
| Page | URL |
|---|---|
| Login | https://uedu.tw/signin |
| Course Setup | https://uedu.tw/course-setup |
| Claim Course | https://uedu.tw/teacher-claim |
| Create a new Course | https://uedu.tw/create-course |
| Teacher Console | https://uedu.tw/teacher-console |
| 2FA settings | https://uedu.tw/2fa/setup |
| 2FA management | https://uedu.tw/2fa/settings |
| Profile | https://uedu.tw/profile |
| Student features page | |
| Learning Profiling | https://uedu.tw/profiling/ |
| AI learning profile | https://uedu.tw/learning-profile/ |
| Learning Portfolio | https://uedu.tw/portfolio/ |
| Teaching Practice Research | https://uedu.tw/practice/ |
| AI Knowledge Base Toolkit | https://uedu.tw/rag-toolkit/ |
| Forum Toolkit | https://uedu.tw/forum-toolkit/ |
| Science Laboratory | https://uedu.tw/science/ |
| The educational significance of the science laboratory | https://uedu.tw/doc/science |
Q: What should I do if I cannot find my Course in search?
Please confirm that the semester and school are correct. If the Course has not yet been imported into the system by the school, please use the "Create New Course" function to create it yourself.
Q: What should I do if the verification code has expired?
Tap "Resend" to obtain a new verification code. A 5-minute cooldown is required between sends.
Q: Students say they cannot join the Course?
Please check: (1) Is the course in private mode? If so, please confirm that you have shared the correct code. (2) Has the code been regenerated? Old codes become invalid after regeneration. (3) Has the Student exceeded the limit of 10 incorrect attempts per hour?
Q: Can I claim multiple Courses at the same time?
Yes. After completing e-mail verification once, you do not need to verify again when claiming other courses within 15 minutes.
Q: Why does the 2FA verification code keep failing?
TOTP codes are time-based; please make sure your phone's system clock is set to 'Automatic time'. An incorrect phone time is the most common cause of failure.
Q: How can I change the AI TA’s behaviour?
In the Instructor dashboard, click 'Course Management' → 'Course Setup' in the left-hand menu and edit the System Prompt field. Changes take effect immediately, and Students' new conversations will use the updated settings.
Q: Can Instructors see conversations between Students and AI?
Yes. In Instructor mode for a Course, you can view all conversation records between Students and the AI TA to understand students' learning status and common questions.
If you have any issues while using it, please feel free to contact us:
| Item | Content |
|---|---|
| Platform URL | https://uedu.tw |
| Technical lead | Assistant Professor Chia-Kai Chang |
| [email protected] | |
| Affiliation | Center for General Education, National Central University |
| Noun | Description |
|---|---|
| System Prompt | A hidden block of instruction text that defines the role, teaching style and behavioural guidelines of the AI TA. Students cannot see this text, but all AI responses are influenced by it. |
| RAG | Retrieval-Augmented Generation. Allows AI to first retrieve relevant content from the teaching materials uploaded by teachers before combining that content to generate an answer, improving the accuracy and relevance of the response. |
| Bloom's Taxonomy | Bloom's revised taxonomy classifies cognitive ability into six levels: remember, understand, apply, analyse, evaluate and create. Uedu uses this framework to analyse the cognitive levels shown in Student and AI dialogue. |
| TOTP | Time-based One-Time Password. A technology used for two-factor authentication (2FA), in which an authenticator app generates a new 6-digit code every 30 seconds. |
| 2FA | Two-Factor Authentication. In addition to a password at sign-in, you must also enter a one-time passcode generated by an authenticator app on your phone, increasing account security. |
| SSE | Server-Sent Events. A web technology that allows a server to push data to the user's browser in real time, used for streaming responses in AI conversations and live captions, among other features. |
| OAuth | Open Authorization. A secure authentication protocol that lets you sign in to Uedu with a Google, Apple or GitHub account without creating an additional password. |
| UeduGPTs | The dedicated AI teaching assistant system created by the Uedu platform for each Course. Instructors can customise the AI's teaching style and knowledge scope. |
| EMI | English as a Medium of Instruction. A teaching model that uses English as the language of instruction. |
| Whisper | An AI speech recognition model developed by OpenAI, used by Uedu for live speech captions and audio transcripts. |
| Browser | Support status | Notes |
|---|---|---|
| Google Chrome | Full support | Recommended: all functions work normally |
| Microsoft Edge | Full support | Chromium-based, with the same functions as Chrome |
| Mozilla Firefox | Most support | Screen recording functionality may be limited |
| Apple Safari | Partially supported | Screen recording and some real-time interaction features are not supported |
Screen recording and Webcam recording are fully supported only on Chrome and Edge. If you need to use the classroom recording feature, please ensure that you use one of these two browsers.